A Guide to Small Kitchen Extension Costs and Designs
Got a cramped, outdated kitchen that drives you mad every day? A small kitchen extension might be the answer. For plenty of homeowners, especially in a city like London, it’s the go-to solution for creating a brighter, more workable space when you feel boxed in by your property’s footprint.
Unlock Your Home's Potential
We’re going to look at how even a modest addition can completely change your home’s character, creating a light-filled hub for cooking, dining, and family life. It’s easy for Londoners to assume a major renovation is out of reach, but often, a cleverly designed small extension is all it takes to unlock a property’s real potential. It’s not always about adding tonnes of square footage; it’s about adding the right kind of space.
This guide will walk you through every critical step, from sketching out initial designs and getting a grip on London-specific costs to navigating planning permission and picking the right build partner. Think of this as your practical, no-nonsense plan for adding serious value and joy to your home.
More Than Just Extra Space
A small kitchen extension is a strategic investment, delivering benefits that go way beyond a few extra square metres. It’s a chance to completely rethink the flow of your ground floor, improving how you live, work, and socialise day-to-day. A well-executed project doesn’t just expand your kitchen; it enhances your entire quality of life.
Here are the key advantages:
- Improved Natural Light: Glazing options like bi-fold doors and rooflights can flood your home with sunlight, making the whole ground floor feel larger and more welcoming.
- Better Connection to the Garden: Creating a seamless link between your kitchen and outdoor area gives you a proper indoor-outdoor living space, perfect for entertaining or just relaxing.
- Increased Property Value: A modern, functional kitchen is a huge selling point. A thoughtfully designed extension can deliver a significant return on investment, often adding 10-15% to your property's value in the competitive London market.
- Properly Customised Functionality: This is your chance to build a kitchen that’s actually tailored to your lifestyle, with an optimised layout, smart storage, and the perfect setup for everything from family breakfasts to dinner parties.
Think of a small kitchen extension not as a construction project, but as a lifestyle upgrade. It’s about turning a wasted side alley or a small patch of garden into your favourite room in the house—the true heart of your home.
Ultimately, this whole process is about turning a space that causes daily frustration into one that brings genuine joy and makes life easier.
Visualizing Your New Space with Smart Design Ideas
A small kitchen extension isn't just about floor plans and extra metres; it's a chance to completely rethink how you live in your home. With the right design choices, even a modest addition can feel incredibly spacious and ambitious. Let's look at some of the most popular and practical ideas we see transforming compact London properties.
For most homes, it comes down to two main approaches: the side-return and the rear extension. Each has its own distinct advantages depending on your property’s layout and what you're hoping to achieve.
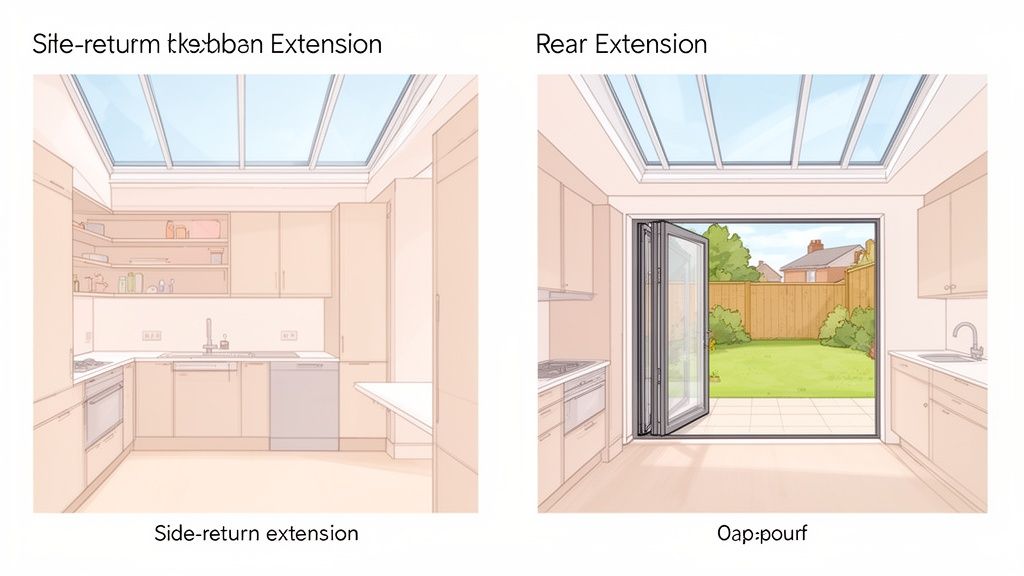
The Clever Side-Return Extension
If you own a Victorian or Edwardian terraced house, the side-return extension is often the perfect solution. It makes use of that awkward, often-neglected alleyway running alongside the back of your house, effectively squaring off the L-shaped floor plan.
Think of it as finding a hidden room you never knew you had. This clever design doesn't steal any precious garden space but can dramatically widen your kitchen. The result is a much more functional, rectangular room that’s ideal for an open-plan kitchen-diner. It's a smart way to gain crucial width and light without a massive footprint.
The Seamless Rear Extension
A rear extension, just as it sounds, pushes the back wall of your house further out into the garden. While it does use a slice of your outdoor space, it’s absolutely brilliant for forging a seamless connection between inside and out.
This is the go-to for homeowners wanting to install large-format glazing like bi-fold or sliding doors. By extending just a few metres, you can create a stunning, light-filled space that feels completely integrated with your garden, making the entire ground floor feel larger and more open.
A well-designed extension isn't just about adding square metres; it's about multiplying the feeling of space. Light, layout, and materials all work together to create an atmosphere that feels open, airy, and far larger than its actual dimensions.
Making a Small Space Feel Big
The real secret to a successful small kitchen extension is creating an illusion of spaciousness. This is where clever design elements come into their own, turning what could be a compact area into an expansive, light-filled hub of the home.
Here are a few proven strategies we use to maximise that sense of space:
- Embrace Natural Light: Well-placed rooflights or skylights are non-negotiable. They pull light down from above, illuminating the deepest parts of the room and making the ceiling feel higher. Honestly, one good rooflight can have more impact than a standard window.
- Install Floor-to-Ceiling Glazing: Bi-fold or sliding doors are genuinely transformative. When you open them fully, they essentially remove an entire wall, merging your kitchen with the patio or garden. This physical and visual link to the outdoors is one of the most effective tricks for making a room feel bigger.
- Choose Light-Reflecting Materials: Opt for glossy or light-coloured worktops, cabinets, and splashbacks. Surfaces like polished quartz, white composite, or high-gloss lacquer bounce light around the room, boosting brightness and creating a feeling of openness.
- Maintain Flooring Continuity: Using the same flooring material throughout the kitchen, dining area, and even extending it out onto an adjacent patio creates an unbroken visual line. This tricks the eye into seeing the entire area as one large, continuous space.
Smart storage is also crucial. For more inspiration, check out our guide on 10 clever ideas for maximizing storage in a small kitchen. Full-height cabinetry that stretches to the ceiling draws the eye upward and, most importantly, eliminates clutter—which is key to keeping that sense of order and space. When you combine these design principles, your small kitchen extension won't just be highly functional; it will feel generous, stylish, and full of light.
Decoding the Costs of a London Kitchen Extension
Let's talk numbers. Understanding the investment is easily the most critical step in any renovation project. When you're planning a small kitchen extension in London, the figures can feel a bit daunting, but having a clear financial roadmap empowers you to make confident decisions.
The final cost isn't one single number; it's a sum of many parts, from the structural complexity right down to the kitchen tap you choose.
Think of your budget like a recipe. The core ingredients—the structural shell, foundations, and roof—make up the bulk of the cost. The finishing touches, like cabinetry, worktops, and appliances, are the flavourings you can adjust to suit your taste and, of course, your wallet.
It’s crucial to remember that London’s competitive market carries a premium. Higher labour costs, logistical headaches like parking, and sheer demand all contribute to prices that are significantly higher than the national average.
Establishing a Realistic Budget
So, what should you really expect to invest? While a precise figure depends entirely on your specific design, we can establish some realistic ballpark estimates using the industry-standard metric: cost per square metre (£/m²).
Recent data shows a clear split between national and London pricing. Nationally, you might see single-storey builds averaging £2,200-£3,300 per m² in 2025. In London, however, a typical 20m² single-storey extension usually demands a budget of £50,000-£70,000. That works out to roughly £2,500-£3,500 per m² for the basic build and initial fit-out.
A popular side-return extension on a classic Wandsworth-style semi could easily reach £70,000-£80,000. These figures really highlight why working with a contractor who provides a detailed, fixed quote is absolutely essential for keeping your finances under control.
Remember, the cost per square metre is just a starting point. It covers the 'build' portion but doesn't always include high-end finishes, bespoke joinery, or premium appliances, which can add substantially to the total.
How Your Budget Gets Allocated
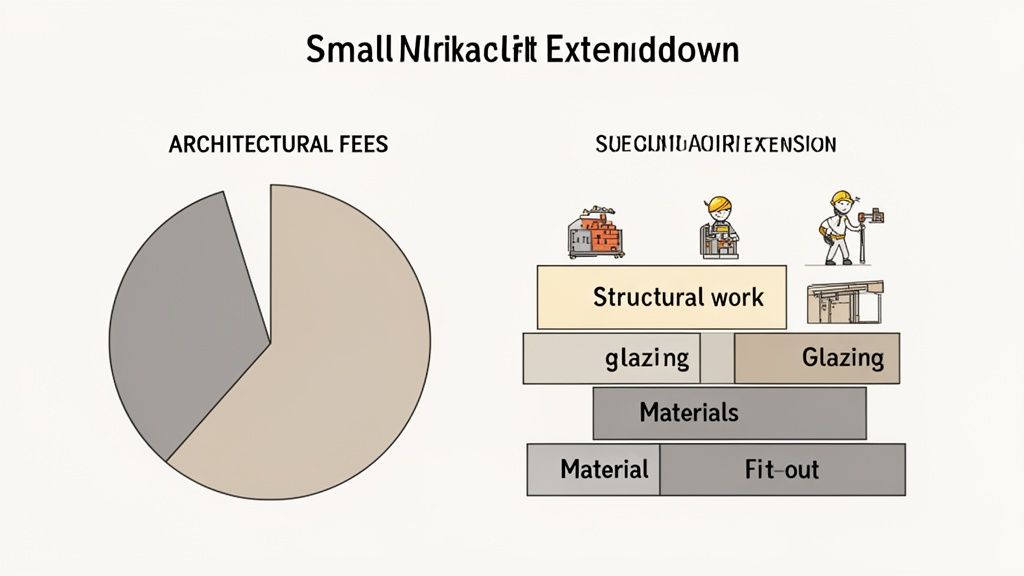
Knowing where your money is going is just as important as the total figure. A typical budget for a small kitchen extension in London isn't spent all in one go; it's distributed across various professional services, materials, and labour throughout the project.
To give you a clearer picture, here’s a table showing how a typical budget breaks down. This helps you appreciate the value of each stage, from the initial architectural drawings to the final coat of paint, and helps prevent any nasty surprises along the way.
| Expense Category | Percentage of Total Budget |
|---|---|
| Main Construction & Shell (Foundations, Brickwork, Roofing) | 40-50% |
| Glazing (Bi-fold doors, Windows, Rooflights) | 15-20% |
| Kitchen & Interior Fit-Out (Cabinets, Worktops, Appliances) | 15-20% |
| Professional Fees (Architect, Structural Engineer, Surveys) | 10-15% |
| Utilities & Services (Plumbing, Electrics, Heating) | 5-10% |
As you can see, the physical structure and glazing often eat up more than half the total cost. For an even more detailed analysis, you can explore our complete kitchen extension cost guide for London.
Key Factors That Influence the Final Price
Not all extensions are created equal, and several key variables can cause your costs to swing up or down. Being aware of these from the outset will help you and your design-build team make smart choices that align with your budget.
Here are the main cost drivers to keep an eye on:
- Structural Complexity: The more complex the design, the higher the cost. Removing multiple load-bearing walls or requiring intricate steelwork (like a box frame) will significantly increase engineering and labour expenses compared to a simpler, more straightforward design.
- Quality of Finishes: This is where you have the most control. Opting for a £2,000 laminate worktop versus a £10,000 polished marble one will have a huge impact. The same goes for flooring, tiles, lighting, and appliances.
- Glazing Specifications: Large-format glazing is a hugely popular feature, but it's also a major budget item. The price of bi-fold doors can vary dramatically based on the frame material (uPVC vs. aluminium), glazing type (double vs. triple), and the overall size.
- Ground Conditions: Unforeseen issues lurking below ground, such as poor soil quality, nearby drains, or pesky tree roots, can require deeper or more complex foundations. This can easily add thousands to the groundwork phase. A soil survey can sometimes be a very worthwhile early investment.
Navigating Planning Permission and Building Regulations
When you decide to build a small kitchen extension, you'll quickly run into the official side of things: planning permission and building regulations. They can sound a bit bureaucratic and intimidating, but they’re two very different beasts, each with a crucial job to do. Getting your head around the difference is the first step to a project that runs smoothly and stays on the right side of the law.
Here’s a simple way to think about it. Planning Permission is all about whether your local council likes the idea of your extension—its size, how it looks, and the impact it’ll have on your neighbours and the street. Building Regulations, on the other hand, are about how it's actually built, making sure it meets national standards for structural safety, fire resistance, and energy efficiency.
So, one is concerned with the look and feel from the outside, while the other governs the technical stuff happening within the structure itself. You’ll almost certainly need to meet Building Regulations, but you might just be able to skip the full Planning Permission process.
Permitted Development vs Full Planning Permission
The great news for many homeowners is that a small kitchen extension can often be built under what are known as Permitted Development (PD) rights. Think of these as a set of pre-approved permissions from the government for common home improvement projects. If your plans fit within these rules, you can bypass the often lengthy full planning application.
To qualify for PD, your extension has to tick some very specific boxes. The rules can get a bit complex, but for a typical single-storey rear extension, the main criteria are:
- Size Limits: For a terraced or semi-detached house, the extension can’t stick out more than three metres from the original back wall. If you’re in a detached house, that limit goes up to four metres.
- Height Restrictions: Your extension can't be taller than the highest point of your existing roof. The eaves (where the wall meets the roof) must be no higher than three metres if your extension is within two metres of a boundary.
- Similar Materials: The materials used on the outside should look similar to those on the existing house.
- Garden Coverage: The extension, combined with any sheds or other outbuildings, must not cover more than 50% of the total land around the original house.
Building under Permitted Development is like following a pre-approved recipe. Stick to the exact ingredients and measurements, and you don’t need special permission to get cooking. But if you start improvising, you’ll need to submit your new creation for approval.
The Non-Negotiable Building Regulations
Whether you need Planning Permission or not, your project must comply with Building Regulations. This is a non-negotiable legal requirement that ensures your new kitchen is safe, healthy, and efficient for everyone living in the house.
A Building Control officer, either from the local council or a private approved inspector, will check the work at key stages of the build. They’ll be looking at everything from the depth of the foundations and the steel beams to the quality of the insulation, making sure every detail meets the required standard. For a deeper dive, you can learn more about how planning permission works for kitchen extensions in our dedicated guide.
Dealing with Party Walls and Conservation Areas
If you live in a terraced or semi-detached house, another piece of the puzzle is The Party Wall Act 1996. This law kicks in if you’re building on or right up to the boundary line you share with a neighbour. You are legally required to serve a formal 'Party Wall Notice' to inform them about the work you’re planning. This isn’t about asking for their permission; it’s a formal notification designed to protect both you and your neighbour and prevent disputes down the line.
And one last thing: if your home is in a Conservation Area or is a listed building, your Permitted Development rights are often restricted or removed completely. In these sensitive areas, even small changes will likely need a full planning application to make sure the unique character of the neighbourhood isn't harmed. Always, always check with your local authority before you get too far into the planning.
Understanding the Build Process from Start to Finish
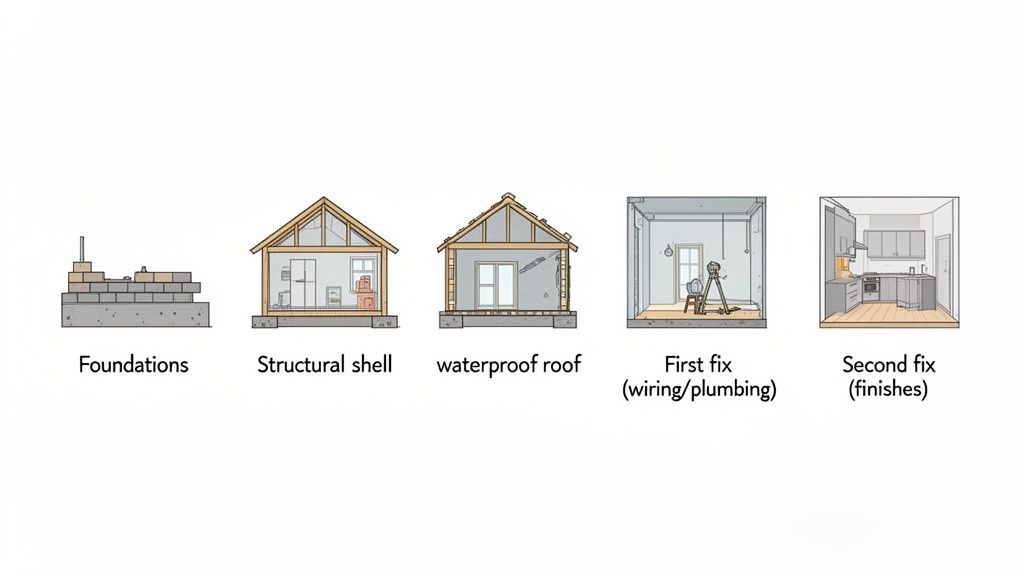
Once your designs get the green light and all the legal checks are ticked off, the real fun begins: the physical transformation of your home. A small kitchen extension build follows a pretty logical sequence, kind of like assembling a giant piece of furniture. Knowing what’s coming at each stage helps you manage the disruption and keep your project moving smoothly.
The whole process kicks off with the groundwork, which, let's be honest, is the messiest and most disruptive part. Your build team will start by clearing the site, digging out trenches for the foundations, and sorting out the drainage. It can feel a bit slow and chaotic, but getting the foundations right is absolutely essential for the structural integrity of everything that follows.
After the groundwork is done, the concrete foundations are poured and left to cure, forming a solid base for the entire structure. Once that’s set, the structural shell—the new walls and roof structure—begins to go up. This is a genuinely exciting moment, as you finally get to see the physical shape of your new space taking form.
From Shell to Watertight Structure
With the main structure in place, the next major goal is to make the new extension watertight. This means getting the roof covering on, and installing the windows and external doors. Hitting this milestone is a big deal because it protects the inside from the unpredictable British weather, allowing interior work to start without delays.
Once the shell is secure, the team creates the structural opening between your existing home and the new extension. This is often the point of no return—and the moment when dust and disruption really peak. A professional team will use proper dust control measures, like sealed plastic sheeting and extraction fans, to keep the impact on the rest of your house to a minimum.
Think of the build process in two distinct halves. The first half is all about creating a strong, weatherproof box. The second half is about turning that box into a beautiful, functional kitchen.
The project now moves inside for what builders call the "first fix" and "second fix." These terms just refer to the two main phases of internal work.
The First and Second Fix Stages
The first fix is all about installing the services that will eventually be hidden behind walls and under floors. It’s the functional skeleton of your new kitchen.
- Plumbing: Pipes for sinks, dishwashers, and any new radiators are put in place.
- Electrics: All the wiring for sockets, lighting, and appliances is run through the walls and ceilings.
- Stud Walls: If you're adding internal partitions, perhaps for a utility nook or pantry, the timber frames are built now.
After the first fix is complete, the space is plasterboarded and plastered, giving you a smooth, blank canvas to work with.
The second fix is where your kitchen truly starts to look like a kitchen. This is the finishing stage, where all the visible bits and pieces are installed and connected to the services put in during the first fix.
- Fitting the Kitchen: This is when the cabinets, worktops, and appliances are installed.
- Final Electrics: Sockets, light switches, and light fittings are all connected and finished.
- Final Plumbing: Taps are fitted, and the sink and dishwasher are fully plumbed in.
- Finishing Touches: Skirting boards, architraves, and internal doors are hung, followed by the final decorating and flooring installation.
Living at home during a build definitely requires a bit of patience, but a well-managed project with clear, regular communication from your contractor makes the whole process far less stressful. By understanding each stage, you can anticipate what's coming next and watch your new kitchen take shape with confidence.
Choosing the Right Contractor for Your Project
Once your designs are finalised and the permissions are sorted, you hit what is arguably the most important decision for your small kitchen extension: choosing the builder. This is the partnership that will define your experience for the next few months. A great contractor is a trusted guide, making sure the process is smooth and the finish is top-notch.
The wrong one, however, can turn an exciting project into a stressful mess of spiralling costs, missed deadlines, and terrible communication. Your builder is more than just hired muscle; they're the custodian of your vision and your home. That makes the vetting process absolutely critical.
You have to look beyond a simple quote and really dig into their professionalism, reliability, and the quality of their past work. Think of it as hiring a long-term project partner, not just a service. The right choice gives you peace of mind; the wrong one will cost you dearly in both money and stress.
The Non-Negotiable Contractor Checklist
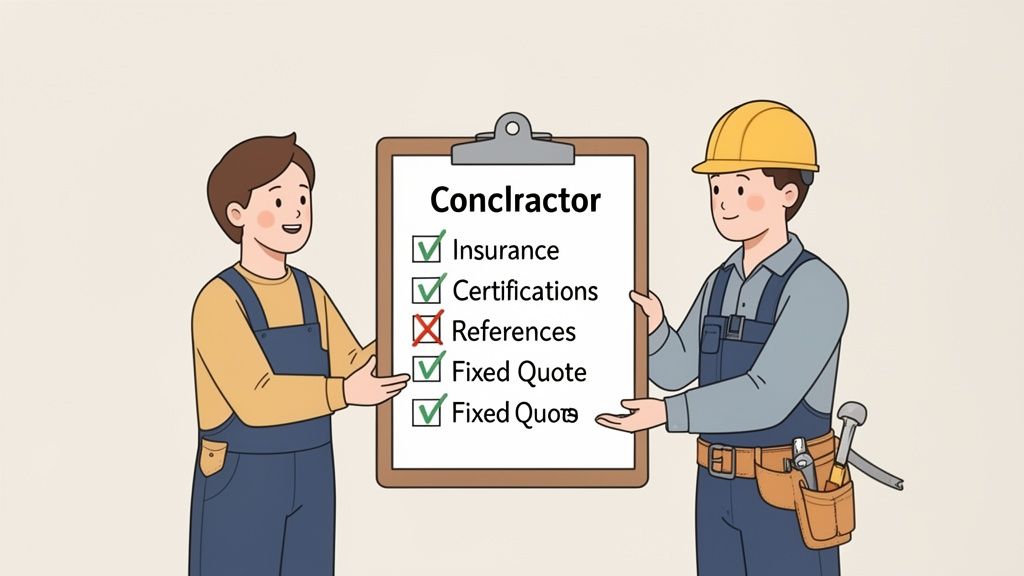
Before you start talking about layouts or finishes, there are some fundamental credentials every potential contractor must have. These are your baseline for safety, compliance, and professionalism. Don’t be shy about asking for proof; a reputable company will have this information ready to go.
- Public Liability Insurance: This is non-negotiable. It protects you and your property if there’s an accident or any damage during the build.
- Professional Accreditations: Look for certifications that show a commitment to quality and safety. For instance, CHAS (Contractors Health and Safety Assessment Scheme) accreditation shows they take site safety seriously.
- Trade-Specific Certifications: Your project involves specialised trades. Make sure they use NICEIC-approved electricians for all electrical work and Gas Safe registered engineers for any heating or gas installations.
A contractor's willingness to provide these documents upfront is a huge indicator of their transparency and professionalism. If a builder gets cagey or makes excuses, consider it a massive red flag.
Beyond the Paperwork: What Really Matters
While certifications are essential, it’s often the intangible qualities of a contractor that make the biggest difference to your project experience. You’ll be talking to this team daily, so a good working relationship built on trust and respect is vital.
This is especially true for a small kitchen extension, where clear communication about the details prevents tiny issues from snowballing into major problems. These are the qualities that separate the adequate builders from the truly great ones.
Key Qualities of a Great Build Partner
Here’s what to look for when you meet potential builders and go through their proposals:
- Transparent, Fixed-Quote Pricing: Vague estimates are a recipe for costs spiralling out of control. A professional firm should give you a detailed, itemised quote that is fixed, giving you financial certainty from day one.
- A Portfolio of Similar Work: Ask to see examples of previous small kitchen extensions they’ve completed in London. This proves they have relevant experience and lets you judge the quality of their finish.
- Clear Communication: A great contractor gives you regular updates and has a clear point of contact. You should feel comfortable asking questions and confident you’ll get a timely response.
- Commitment to a Tidy Site: A tidy worksite isn’t just about looking good; it’s a sign of a well-organised, respectful, and safe team. This is crucial for minimising disruption, especially if you’re living in the property during the build.
Ultimately, choosing the right contractor is an investment in the success of the project itself. In the UK, particularly in bustling London areas, a well-designed small kitchen extension can boost your property's value by a solid 10-15%. This makes it one of the smartest investments for homeowners, and the right team ensures that investment pays off. Discover more insights about London extension statistics on allwellpropertyservices.co.uk.
Your Top Questions Answered
Starting a small kitchen extension always brings up a flurry of practical questions. After guiding countless London homeowners through this exact process, we've pretty much heard them all. To wrap things up, here are some straightforward answers to the queries that pop up most often.
Getting your head around these details is the key to planning well and avoiding the usual headaches. A clear understanding of the timeline, day-to-day logistics, and who does what will make the entire project feel much less stressful.
How Long Does a Small Kitchen Extension Take?
A realistic timeline is more than just the time builders are on-site; it’s broken into a few distinct phases. First, you should set aside 2-4 months for all the upfront work—that’s the design, engineering, and navigating the planning approval process. This is where all the critical thinking and paperwork happens.
Once you’ve got the green light, the construction phase itself typically takes another 3-5 months. So, from the first sketch to the final coat of paint, a full project often spans 6-9 months. Things like complex structural work or sorting out party wall agreements can stretch this out, which is exactly why having an experienced project manager is so vital for keeping things on schedule.
Can I Live in My House During the Build?
Yes, you can usually stay put, but it’s best to be mentally prepared for a bit of a shake-up. There will definitely be noisy and dusty periods, especially when the big structural opening is made between the old house and the new space.
A professional contractor's main job, beyond the build itself, is to minimise the disruption to your life. We do this by sealing off the work zone properly, using serious dust control measures, and leaving the site tidy at the end of every single day.
A lot of our clients find it helpful to set up a makeshift kitchenette somewhere else in the house. A microwave, kettle, and a small fridge tucked away in the living room can make a world of difference during the most intense phases, ensuring life can carry on with some degree of normality.
What Is the Difference Between an Architect and a Design-Build Firm?
This is a really important distinction, as it completely changes how your project is run. The traditional route is to hire an architect to draw up the plans and then, separately, find a builder to actually construct it. You end up managing two different contracts and acting as the go-between.
A design-build firm, on the other hand, offers a single, integrated solution. One company handles everything from the initial concept and architectural drawings right through to the final build, all under one roof and one contract. The big advantage here is having a single point of responsibility. It leads to clearer communication, tighter cost control, and a much smoother, more streamlined project from start to finish.
Ready to transform your home with a beautiful and functional kitchen extension? The team at All Well Property Services offers a complete design-and-build solution, managing every detail with professionalism and care. Contact us today for a fixed-price quote and start planning your project with confidence.
Free tools to help plan your project
No email required. Get instant estimates and planning answers.
Kitchen Cost Calculator
Get an instant estimate for your kitchen extension project in South East London. Factor in extension type, size, finish level, and your borough for a personalised cost breakdown.
Kitchen Value Calculator
Estimate how much value a kitchen extension could add to your property. Calculate your return on investment based on your borough, property value, and extension type.
Kitchen Timeline Calculator
Plan your kitchen extension timeline from start to finish. Factor in planning permission, party wall agreements, and seasonal adjustments for a realistic project schedule.
Extension Size Checker
Find out how big you can build your rear extension under permitted development rules. Enter your property type and garden dimensions for an instant maximum footprint calculation.
Related projects in your area
Real kitchen extensionswork we've done in the boroughs covered in this article. Fixed-price contract, single project manager, full Building Control sign-off.
Kitchen Extensions in Wandsworth
Wandsworth town has a mix of Victorian terraces near the Common and larger period houses towards the river, both of which are ripe
Bathroom Fitting in Wandsworth
Wandsworth clients generally want a clean, contemporary bathroom: walk-in shower with a rainhead, wall-hung vanity, heated towel r
Loft Conversions in Wandsworth
The Victorian terraces around Wandsworth Common and the Edwardian properties near Earlsfield have good roof structures for loft co
Property Renovation in Wandsworth
Wandsworth has some of the most diverse renovation projects we take on, from compact Victorian terraces that need a full refurbish
Kitchen Extensions in Anerley
Anerley is our home borough.
Kitchen Extensions in Crystal Palace
The Victorian terraces climbing the hill around Crystal Palace Park are prime candidates for kitchen extensions.