City homes often come with bathrooms that feel tight and awkward. You might struggle to fit everything you need without the space feeling cramped or cluttered.
Small bathrooms are common in flats and terraced houses, but size doesn’t have to limit function or style.
The right layout can turn even the smallest bathroom into a comfortable, organised spot that works for your daily routine. Choosing the right fixtures, positioning them thoughtfully, and using clever design tricks can make your compact bathroom feel much larger.
Simple changes like wall-mounted toilets, corner showers, and smart storage free up floor space and improve how the room flows. It’s kind of wild how much difference a few tweaks can make.
This guide shares practical layout ideas for city homes. You’ll see how to arrange fixtures, add storage, and use light and colour to get every bit of use out of your small bathroom.
Key Takeaways
- Smart fixture placement and wall-mounted options open up floor space and make small bathrooms feel bigger
- Vertical storage, open shelving, and multi-functional furniture help you organise without cluttering things
- Light colours, good lighting, and glass partitions boost the sense of openness in tight bathrooms
Fundamentals of Small Bathroom Layouts
Small bathroom layouts call for precise planning around three things: room format, movement clearance, and fixture positioning. These basics decide if a compact bathroom feels squeezed or works well.
Understanding Small Bathroom Formats
Small bathrooms in UK homes usually fall into three main types based on size and function. A cloakroom measures 1.2m² to 2m² and only fits a toilet and basin.
An en-suite ranges from 2.5m² to 3.5m² and includes a toilet, basin, and compact shower. A small full bathroom sits between 3m² and 4m² and fits a toilet, basin, and either a 1400mm bath or 800mm shower enclosure.
The National House Building Council says new-build flats usually give bathrooms 3.6m² to 4m². Under-stair cloakrooms can be as tiny as 0.9m x 1.8m.
These constraints mean you need wall-hung units and slimline fixtures to meet spacing rules. Your bathroom format dictates which fixtures you can include and where they have to go.
Interior designers suggest figuring out your room type first, then picking fixtures that fit those size limits.
Planning for Flow and Clearance
UK Part M regulations set specific clearance zones for safe movement. You need at least 430mm in front of your toilet and 600mm in front of your basin.
Leave 700mm between opposing fixtures for comfortable passage. Your door swing can eat up a lot of usable space—an inward-opening door can block up to 25% of floor area in rooms under 3m².
Consider pocket doors, bifold doors, or outward-opening options to reclaim that space. Always measure your actual floor area before choosing fixtures.
Record ceiling height, door position, and window placement. These measurements save you from picking oversized sanitaryware that blocks how you move around.
Space-Saving Fixture Placement
Group your plumbing along one wall to cut down on pipework and open up the floor. Try to put your toilet, basin, and shower on the same wall if you can.
Wall-hung fixtures show off more floor area. Go for toilets with 500mm to 520mm projection depths and floating vanities with 350mm to 450mm depths.
These sizes keep circulation zones open and still give you everything you need. Corner placements use dead zones smartly.
A corner basin (400mm to 500mm wide) frees up central space near doorways. Quadrant shower enclosures with curved fronts (800x800mm or 900x760mm) soften harsh angles in tiny bathrooms under 3m².
Mount recessed storage within stud walls above toilets and beside basins. These alcoves offer shelving without sticking out into walkways.
Essential Layout Concepts for City Bathrooms
City bathrooms need layouts that work with tight dimensions, not against them. Corner installations, wet room conversions, and linear arrangements can create functional spaces that feel bigger than they are.
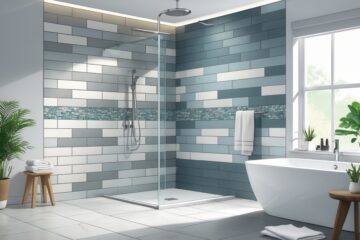
Corner Showers and Sinks
Corner showers save floor space by using spots that usually get ignored. A standard corner shower tray measures 800mm x 800mm, leaving more room for other fixtures than traditional enclosures.
Pair this with frameless glass screens to avoid visual barriers that make the space feel smaller. Corner sinks and vanities follow the same idea.
These fixtures tuck into corners but still give you enough washing space. A corner vanity unit offers hidden storage without sticking out into the centre of the room.
Corner toilets are less common but can work in layouts where every centimetre matters. The trick is measuring your available corner space before you buy anything.
Some corners fit full-sized fixtures, others need compact versions. Wall-mounted corner installations open up even more floor.
Wet Room Design Principles
Wet rooms ditch shower trays and enclosures completely. The floor slopes gently to a drain, and the whole space gets waterproofed.
This removes physical divisions that chop up small bathrooms. You’ll need proper tanking (waterproofing) beneath tiles and a slight gradient in the floor.
Walk-in shower areas in wet rooms need at least 800mm x 800mm of space. Careful water management and screen placement keep the rest of the bathroom floor dry.
Wet rooms work well in small bathrooms because they create continuous flooring. Your eye travels across the space without stopping at shower barriers, making the bathroom feel way bigger.
Partial glass screens keep water spray contained while still letting the room feel open.
L-Shaped and Inline Layouts
L-shaped layouts put fixtures along two adjacent walls. This setup works especially well in square or nearly square bathrooms.
You might put the toilet and sink on one wall, with a bath or shower on the other. This keeps the centre of the room open.
Inline layouts put everything along a single wall, which suits narrow bathrooms where width is tight. Your toilet, sink, and shower sit side by side in a straight line.
This setup makes the most of rectangular spaces. Both layouts need careful measurement of fixture projections.
Short-projection toilets extend 600-650mm from the wall instead of the usual 700mm. Slimline sinks cut down projection but still work well.
These compact options stop inline and L-shaped layouts from feeling cramped.
Maximising Space with Smart Fixtures
The right fixtures can free up valuable floor space and make your small bathroom feel more open. Wall-mounted toilets and basins lift essentials off the ground, while floating vanities combine storage with a lighter look.
Wall-Mounted Toilets and Basins
Wall-mounted toilets hide the cistern inside the wall, giving a cleaner look and freeing up floor space for easier cleaning.
These toilets usually project 50-55cm from the wall, though you can get short-projection ones at around 48cm for tighter spots. Wall-mounted sinks do the same job.
They create an airy feel by exposing the floor underneath and can be installed at any height. Key benefits of wall-hung fixtures:
- More visible floor space, so rooms feel bigger
- Easier to clean around and below
- Modern, streamlined look
- Pipes stay hidden for tidier walls
You’ll need proper wall reinforcement and plumbing access, so a professional should fit them. Wall-hung WCs need a strong frame behind the wall, but the space savings and look make it worth it.
Floating and Slimline Vanities
A floating vanity attaches to the wall but doesn’t touch the floor, which makes the room look bigger and still gives you storage.
Compact vanities start at 300mm wide, so they even fit in super narrow cloakrooms. Look for wall-hung vanity units with soft-close drawers or push-to-open doors to get more storage without handles sticking out.
Slimline designs at 250-350mm depth are great for tight layouts and still offer decent basin space. Floating vanities show off more floor, which tricks your eyes into thinking the room is larger.
The gap underneath also makes cleaning easier and keeps things from feeling cluttered.
Pocket and Sliding Door Solutions
Standard hinged doors need space to swing open, wasting valuable room in small bathrooms. Pocket doors slide into a cavity in the wall and disappear when open.
Sliding doors run along a track and overlap the wall, so you don’t need swing space. Either option can reclaim up to 1 square metre of usable floor area.
These solutions are especially good in narrow bathrooms where a standard door would block access to fixtures or storage. Installation costs more than a standard door, but in city homes where every centimetre counts, it’s usually worth it.
Creative Storage Solutions for Small Bathrooms
Small bathrooms need smart storage that works with limited space. Vertical storage, recessed features, and hidden compartments can turn cramped spots into organised, functional areas.
Vertical and Over-the-Toilet Storage
Vertical storage uses wall space that you’d probably ignore otherwise. Over-the-toilet storage is especially handy—it turns dead space into functional storage without eating up floor area.
Wall-mounted shelves give you storage without cluttering up your bathroom. Floating shelves above the toilet or along bare walls let you stash toiletries, towels, and even a plant or two.
You can stack several shelves at different heights to make the most of the wall. Tall, narrow cabinets squeeze into tight corners and vertical spaces.
These units hide stuff away while barely using any floor space. Wire baskets and bins on open shelves help keep smaller bits like cleaning products and personal care items sorted.
Corner shelves make use of awkward spots that are tough to use otherwise. Pop them in shower corners for toiletries or in room corners for towel storage.
Recessed Shelving and Wall Niches
Recessed shelving builds storage into your walls instead of sticking out into the room. This is a lifesaver in small bathrooms where every centimetre matters.
Recessed wall niches fit between studs, giving you storage without taking up floor space. You can put them in the shower for shampoo and soap or next to the vanity for daily essentials.
These built-in features look clean and modern while keeping things handy. Converting old medicine cabinets into open alcoves gives you shelving in spaces you already have.
Recessed cabinets above the sink or toilet keep essentials within reach without jutting into the room.
Hidden and Concealed Storage Units
Hidden storage keeps your bathroom tidy by tucking things behind closed doors or inside furniture. These clever solutions keep everything streamlined but still give you plenty of space for essentials.
Under-sink storage makes the most of the cabinet area around plumbing. Low-profile bins and tiered organisers fit around pipes and give you spots for cleaning products and toiletries.
Drawer organisers inside vanity units separate makeup, toothbrushes, and skincare—no more digging around for stuff. Mirrored cabinets double as mirrors and concealed storage.
Secret cabinets behind decorative panels or mirrors hide medicine and personal items. Wicker bins on shelves add texture and keep clutter out of sight.
Light, Colour, and Illusion of Space
Small bathrooms can feel more spacious with the right lighting, reflective materials, and smart tile choices. These design tricks work together to brighten up the room and add visual depth where space is tight.
Natural and Artificial Lighting Strategies
Natural light turns a cramped bathroom into an airy retreat. If you’ve got a window, keep it clear or use frosted glass for privacy but still let in the light.
Thinking about a bigger window? If your budget allows, it can completely change how spacious the room feels.
Artificial lighting should layer up. Ceiling spotlights give general light, and wall-mounted lights beside mirrors help with tasks.
This combo wipes out shadows and makes the space feel bigger. Backlit mirrors add both light and a soft glow.
They spread light across the walls and bounce it off surfaces. Small bathrooms really benefit from dimmable lighting, so you can tweak the brightness depending on the time of day.
Try to position lights to highlight vertical space. Uplighting draws your eyes up and makes the ceiling feel higher—kind of a neat trick for making the room seem taller than it is.
Reflective Surfaces and Mirrors
Mirrors are hands down the best trick for making a bathroom look bigger. Stick a big mirror opposite your window and you’ll see the natural light bounce all over the place.
The larger the mirror, the more dramatic the effect—honestly, you can’t really overdo it. Mirrored cabinets are super practical too, giving you storage and helping the room feel more open.
Try mounting mirrored cabinets above the sink or even along a whole wall if you’ve got the space. Some folks go all in with a fully mirrored wall, and it really does erase visual boundaries.
Glass shower doors are another game changer. Frameless glass keeps the sightlines clear, unlike chunky frames or shower curtains that chop up the space.
A glass partition for your shower helps define the area but keeps things feeling open. It’s a simple switch with a big payoff.
Don’t forget about other reflective touches. Chrome taps, glossy tiles, and shiny surfaces all help bounce light around.
These details make your bathroom brighter and more spacious, even if it’s actually tiny.
Light and Large-Format Tiles
Light colours are your friend in a small bathroom. White, cream, pale grey, and soft pastels keep things airy and make walls seem to disappear.
A clean, pale backdrop tricks your eye into thinking the room is bigger than it is. Large-format tiles are another smart move.
Bigger tiles mean fewer grout lines, so the walls and floors look more seamless. Your eyes just glide across the space without stopping.
Most large tiles run from 60cm × 60cm up to 120cm × 60cm. Porcelain is a solid pick for bathrooms because it holds up against water and daily use.
Go for glossy or semi-gloss finishes over matte; shiny tiles reflect more light and amp up the brightness. If you take tiles all the way to the ceiling, it draws your gaze upward and adds a bit of drama.
Matching your floor and wall tiles or at least sticking with similar light shades helps keep the vibe unified. That way, the space doesn’t feel chopped up.
If you want contrast, that’s fine, but just know it can make the room feel smaller by breaking it into sections.
Design Enhancements and Luxury Touches
Even small city bathrooms can feel fancy and comfortable with a few clever upgrades. Heated elements, smart bath choices, and coordinated finishes can turn compact spaces into high-end retreats.
Heated Towel Rails and Underfloor Heating
Heated towel rails are both warm and practical—plus, they don’t hog your floor. Pick from chrome, brushed brass, or matte black for some visual flair and to keep towels toasty.
Slim, vertical models fit nicely between fixtures in tight bathrooms. Underfloor heating spreads warmth everywhere and ditches the need for clunky radiators.
That means more wall space for storage or other features. Stone or large-format tiles work especially well with underfloor heating since they hold and spread heat.
These heating solutions make chilly mornings way more bearable. They also help cut down on moisture and condensation, which is a win for keeping mould at bay.
Statement Tubs and Shower Baths
A freestanding tub can totally steal the show, even in a small bathroom, if you place it right. Try a compact model—about 1400mm long—to fit tight spaces but still get that wow factor.
Wall-mounted taps save even more room. P-shaped shower baths are great for city bathrooms, giving you a roomy shower at one end and a classic bath at the other.
Add a glass screen to the wide end, and you’ve got a clear shower zone. Rainfall shower heads bring a spa vibe.
Mount the shower head overhead for full coverage. If you can’t fit a separate shower enclosure, these setups are a solid compromise.
Finishing Details for Cohesion
Accent lighting can really bring out the best in a small bathroom. LED strips inside shelves or under floating vanities add a soft glow without cluttering things up.
A custom vanity is a lifesaver for awkward corners or tricky alcoves. Tailor the size to fit the space and keep the lines clean.
Soft-close drawers are a little luxury that make daily routines nicer. Matching your metallic finishes—think taps, rails, cabinet handles—helps everything feel pulled together.
Muted colours and natural textures like marble or stone keep the vibe calm and inviting. It’s those little choices that make a bathroom feel special, not just functional.
Frequently Asked Questions
Small bathrooms can be a pain, but with some smart design, you can turn them into surprisingly functional retreats. Here’s a quick run-through of common questions about maximising compact bathrooms in city homes.
How can I create the illusion of more space in a compact bathroom?
Start with wall-mounted fixtures. Lifting the toilet and sink off the floor lets you see more flooring, which instantly makes the space feel bigger.
Plus, it’s way easier to clean under them. Mirrors are another easy win.
Put a big mirror across from your window to bounce natural light all over. For a real transformation, go for a mirror that takes up a whole wall.
Frameless glass shower screens keep the room open. Swap out heavy frames or curtains for clear panels and the space instantly feels less chopped up.
What are the most effective storage solutions for small urban bathrooms?
Hidden storage is a must. Wall-mounted cabinets with doors keep clutter out of sight and don’t eat up floor space.
Before you buy storage, declutter and stick to what you really use. Mirrored cabinets above the sink double up on function—reflecting light and hiding your stuff.
Tall cabinets that reach toward the ceiling make use of vertical space you might otherwise ignore. Corner units are a smart way to use those awkward spots that usually stay empty.
Corner shelves or a compact vanity can snag every last centimetre. Combo fixtures, like a toilet with built-in storage or a vanity, help cut down on the number of bulky pieces you need.
Are there specific colour schemes that help make a small bathroom feel larger?
Light colours are the way to go. White, soft grey, and pale neutrals reflect light and keep things feeling fresh.
If your bathroom doesn’t get much sun, these shades can really help. Using the same colour from floor to ceiling makes walls look taller.
Stick to one palette instead of breaking things up with bold contrasts. That way, the space feels more open and unified.
If you want a bit of variety, try subtle differences within the same colour family. You can add texture with tiles or finishes without making the room feel busy.
Can you suggest any space-saving fixtures suitable for a small bathroom layout?
Short-projection toilets and sinks are a lifesaver. They stick out less but still work just as well.
Wall-mounted versions make the floor look bigger. Shower baths are another smart pick.
L-shaped or P-shaped designs give you both a shower and a bath in one spot, perfect for families. Standard shower trays (800mm x 800mm) take up way less space than a full-length bath.
Corner showers are a clever way to use space that might otherwise go to waste. Wet rooms with minimal fixtures keep the floor open and the room feeling airy.
What lighting strategies can I employ to enhance the perceived size of a small bathroom?
Mix up your light sources. Instead of relying on a single overhead light, combine ceiling spotlights with wall lights at different heights.
Layered lighting kills shadows and makes corners feel less cramped. Maximise natural light if you can—adding or enlarging a window makes a huge difference.
Big windows bring in tons of daylight, making even a small bathroom feel luxurious. Make sure your lighting plan covers every area evenly.
No one wants dark corners that shrink the space. LED strips under cabinets or along mirrors give you a soft, modern glow without hogging room.
How do I select tiles for a small bathroom to improve its spatial dynamics?
Tile placement can totally change how big or tall your bathroom feels. Try running the tiles all the way up to the ceiling instead of stopping them halfway.
Those vertical lines? They make the walls look taller and pull your eye upward.
Large-format tiles are a smart move. You get fewer grout lines, which means less visual clutter.
Honestly, when there’s less segmentation, the space just feels more open. Lighter colors—think marble effects or soft neutrals—can really boost that sense of airiness.
If you want the room to flow, stick with the same flooring throughout. Using identical tiles on the floor and in the shower gets rid of awkward visual breaks.
This trick shines in wet rooms, where the floor just rolls from one area to the next without any fuss.